In the Inspector, you’ll find the controls for the tool you’re currently working with. You can also view and edit the properties of selected objects, manage import options, and more.
Opening the Inspector
At the right of your screen, you find the Inspector, which you can always hide/show by pressing the ⌥⌘2 key. It is divided into collapsible menus, decluttering your workspace and making it easier to focus on your current work.
The Inspector is also Context-Aware, which means it displays automatically some extra sections according to the content selected. These sections will appear below the Location Menu.
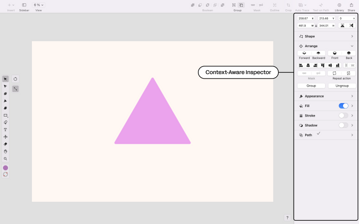
Always locked at the top, you can control the position, rotation, and size of the selected object(s). The Flipping buttons at the bottom right of the Location Menu will mirror the selected object horizontally or vertically. Just click the buttons to perform these actions.
The collapsible menus are divided as follows:
- The Shape Section
- The Arrange options, such as Order, Align, Distribute, Mask, Repeat Action and Group.
- The Appearance options, such as Blend Mode, Opacity, and Blur.
- Fill
- Stroke
- Shadow
- Path
The Fill, Stroke, and Shadow Sections can be toggled on and off to activate or deactivate the corresponding features of each section.

Note:
If you're familiar with Curve on iPad you can recognize a similar structure but divided into multiple tabs.
The Shape Section
The Shape Section, located below the Location Menu lets you set the Corner Radius and the Smoothing level of your shape or path. The section is context-sensitive and displays the Smoothing controls and/ or the Corner Radius controls depending on the currently activated tool.
The Arrange Options
Below the Shape Section, can find the Arrange Options which allow you to:
A – Order: Change the Stack Order of your elements
B – Align: Align your objects using the six alignment buttons in the top row
C – Distribute: Adjust even spacing between multiple objects, by distributing them horizontally or vertically
E – Mask: Mask and/or Unmask with a single click of your mouse
D – Repeat Action: Repeat the last action with one click
F – Group: Group and/or Ungroup your objects

The Appearance Options on Mac
Right below the Arrange Options, you can find the main appearance controllers that will be activated as soon as you select at least one element of your document:
A – The layer Blend Modes, which will be accessible via pull-down menu.
B – The Opacity Slider controls the Opacity value of your selected shape(s).
C – The Blur Slider controls the Blur amount of your selected shape or path.

The Path Section
The Path Section is the go-to section for editing and modifying paths. It contains the following options:
A – Boolean Operations,
B- Join, Combine, and Separate Paths.
C- Edit and Finish paths
D – Add or Remove Bézier Nodes,
D – Outline a path,
E – Text on Path, Reverse, Outline, and Offset Path.

Context-aware Options
The Inspector, as on iPad, is context-aware. This means that it adapts according to the currently selected object or tool. For example, when drawing with the Pen Tool, the Inspector displays the different Node Types (A), Close (B), and Finish (C) paths.
The Context-aware Options always appear below the Location Menu.

When you select a text box, the Inspector will display the text options below the Location Menu, where you can select the Font Type (A), Text Alignment (B), change the Kerning, Tracking, and Line Height (C), set the Textbox Resizing (D) behavior or Create Outlines from Text (E).

Toolbars
The Toolbar is where you’ll find quick shortcuts to essential tools and actions in the Mac app. Our Mac App interface contains two separate toolbars, let's see what they offer.
The Linearity Curve (formerly Vectornator) Mac App interface consists of two Toolbars:
- The left Toolbar (1), which contains the main tools to select, edit and add elements to the canvas.
- The top (Editor) Toolbar (2) lets you access your favorite editing tools.
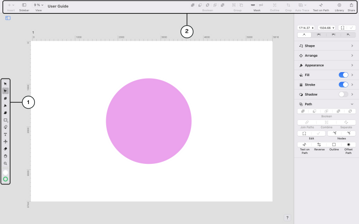
The Toolbar
The Toolbar on the left side of the interface of Linearity Curve gives you access to several tools for selecting, editing, drawing, erasing shapes, and adding text.

The Selection Tool
With the Selection Tool, you can select objects by clicking on them. You can also select a group of objects by clicking and dragging a box around them.
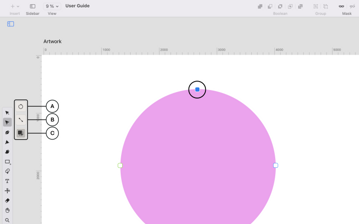
Once selected, it activates the Rotate (A), Scale (B), and Click Through Mode (C).
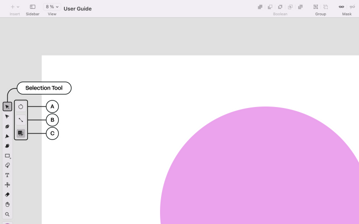
When using the Selection Tool, you can also perform further actions, such as selecting multiple objects at once or duplicating selected objects by using specific shortcuts.
How to rotate an object
On top of your selected shape, you can see the Selection Box Transformation Grid in blue with its circular blue handles on top of your shape. On top of each grid, you will find the orange-colored circular Rotate Handle.
You have three options available to rotate your selected shape in Linearity Curve:
object Object0. You can rotate your selected shape by clicking on the Rotate Handle that is located on top of your shape, and by simultaneously rotating the orange handle to the right or the left. object Object1. Furthermore, you can activate the Rotate Mode by clicking on the Rotate Icon (A) to the right of the Selection Tool. Hold and drag up or down to rotate the shape clockwise or counterclockwise. object Object2. You can rotate your selected shape by entering the rotation degree value in the top part of the Inspector.
One very handy feature in Linearity Curve is that while you are rotating your selected shape, an Indicator Window will display and update your rotation degree in real-time.

The Rotate Handle
This feature appears at the top of any selected shape.
You can rotate any shape by clicking on the orange dot and then dragging with the mouse cursor to the left or the right.
The Rotate Mode
Select your shape using the Selection Tool, and activate the Rotate Mode (1) by clicking the button. Then, click and drag anywhere on the canvas to rotate your selected shape.
With this tool, you can also change the Pivot Point (2) on which your shape rotates. Click on the Pivot Point and then hold and drag it to its new position on the canvas.
Enter a degree value
You can enter a value in degrees in the Inspector. You can click the Up and Down arrows or enter a value numerically (positive and negative values can be entered).
Note:
In this case, the rotation considers the Pivot Point as the center of your shape.
How to resize an object
In Curve, you can resize your shapes in many ways. You can do this by:
- Using the Scale Tool from the Toolbar.
- Dragging one of the Selection Handles.
- Resizing the object's dimensions in the Inspector.
You have specific shortcuts available in Linearity Curve which allow you to:
- Resize your shape while keeping its Aspect Ratio
- Resize the object from its center pivot.
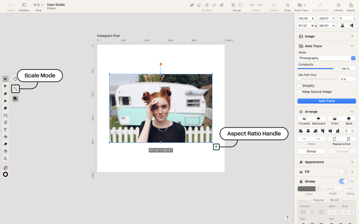
- Resize the object while keeping its Aspect Ratio intact by dragging on the green circle- the Aspect Ratio Handle - at the bottom-right of your selected shape. The technique applies to Masks, Groups, and Text elements too.
The Scale Tool
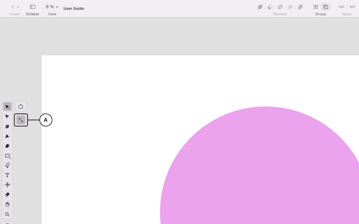
Select your shape using the Selection Tool, then click the Scale Mode button (A). Then, click and drag anywhere on the canvas outside the shape to adjust the size.
With this tool, you can also change the pivot point on which your shape is resized. Click on the canvas to change the pivot point.
Dragging to resize
To resize any shape or image, select it, then click and drag on one of its Selection Handles. The handles on the sides of the shape will adjust the width of your shape, the handles at the top and the bottom of your shape will adjust its height.
If you drag on one of the four corner handles, you can adjust the height and width of your shape simultaneously.
Resizing the object in the Inspector
You can also resize any element by selecting it and typing its dimensions at the top of the Inspector. You can enter a specific value by tapping the Size, Width, and Height Boxes.
If the lock icon is closed, the object will resize with a fixed Aspect Ratio; otherwise, you can turn off the lock with a click and then change it to only one dimension.
Note:
By default, this will resize the shape from its top-left corner.
Resizing while keeping the Aspect Ratio
Press the ⇧ key while dragging on any selection handles to keep the Aspect Ratio of your shape.
Another option to resize an object while keeping its Aspect Ratio intact is to drag on the green circle the Aspect Ratio Handle at the bottom-right of your selected shape.
Resizing from the center
To resize any shape from its center, instead of the edge you’re dragging from, hold the ⌥ key while dragging on any of the Selection Handles.
How to scale objects
To scale your object, you can drag the shape from one of the corner points of the selection box or activate the Scale Mode by clicking on the Scale Button (B) to the right of the Selection Tool. To help you scale the object to a fixed size, the object's dimensions will be displayed at the bottom center of the object in a light blue box. But remember, the values displayed are rounded to the closest whole digit, and decimal points will not be displayed.
The Dimensions Indicator works on single objects, multiple selected objects, and groups of objects.
Note:
You can hide the Dimension Indicator by deactivating it in the Menu Bar > View > Show Dimensions.
The Node Tool
The Node Tool, or the Direct Selection Tool, is the second tool from the top inside the Toolbar. It creates, selects, moves, and edits* *Bézier Nodes. Once selected, it activates the Rotate (A) and Scale (B) Mode and Click Through Mode (C), too.
The Scissors Tool
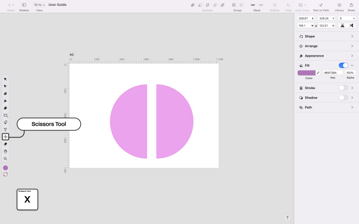
The Scissors Tool can be used to split an existing shape or path.
Note:
The Scissors Tool only applies to a single vector object, not a raster image.
The Pen Tool
The Pen Tool is used to edit your vector points and create custom paths with Bézier Curves*.*
If you start to create a path with the Pen Tool, the Content-Aware Options (CAO) will open automatically. The Content-aware Options Menu allows you to change the Node Types and to Close or Finish a path.

The Pencil Tool
The Pencil Tool is used to draw Freeform Paths. To activate the Pencil Tool, click the Pencil Button in the Toolbar or press N on the keyboard.
At the right of the Pencil Tool, you’ll find a slider to control the Pencil Smoothness. If you want your path to be exactly as you draw it, you can set the value to 0%. Setting the value higher will increase the level of smoothing that the Pencil Tool will apply to the line you draw. The smoothness of your path can also be adjusted after drawing. Select your path, and the Smoothness Slider will appear inside the Shape Section and on the right side of the Pencil Tool.

The Brush Tool
The Brush Tool allows you to draw freeform paths with variable widths.
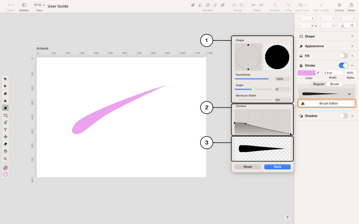
To activate the Brush Tool, press the Brush Button Icon in the Toolbar or press B on the keyboard. You’ll find a Brush Size Slider (2) to the right of the Brush Tool to control the brush size.
Alternatively, you can enter a numeric value in the Stroke Section.
The lower the numeric value, the smaller your brush-width, and vice versa.
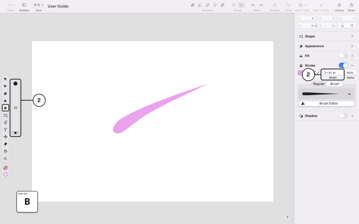
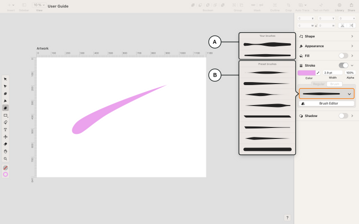
Once you select the Brush Tool, the Stroke Section in the Inspector will switch to Brush Mode, where you can create new brushes or use the preset brush options. In these Content-Aware Options, you will find the Brush Editor (1) and the Brush Selection Pane (2).

The Brush Editor
In the Brush Editor, you can customize the Shape and Contour properties of your Brush. Additionally, you can Preview, Save or Reset your Brush Settings in this panel.
The Brush Selection Pane
The Brush Selection Pane when closed, shows a live preview of the current active brush.
By clicking on this pane, it displays a list of the Preset Brushes, which are built into the Brush Settings Panel.
The Text Tool
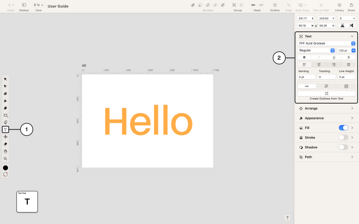
The Text Tool allows you to insert text elements into your document.
To activate the Text Tool, press the Text Button (1) in the Toolbar, or press T on the keyboard. When you select the Text Tool, the Text Panel (2) will appear at the top of the Inspector.
The Shape Tool
The Shape Tool allows you to create pre-made geometric shapes, like rectangles, circles, polygons, or straight lines. The Shape Tool is located inside the Toolbar (on the left side of the canvas) and will give you access to different shape options in the context menu, such as:
- Rectangle . To activate it, click the Rectangle Button or press the R key on the keyboard. When selected, you can change the roundness of the corners of your object.
- Polygon . Slide to alter the number of sides in the object.
- Oval . To activate the circle shape, click the Rectangle Button or press the O key on the keyboard. Holding the Shift Key while drawing creates a perfect circle.
- Star . Slide to define the number of points contained in the star shape.
- Line . To activate the line shape, click on the Line icon or press the L key on the keyboard.
- Spiral . Slide up and down to alter the decay of the spiral shape.

Read more:
about the Linearity Curve Mac software.
How to edit the Corner Radius
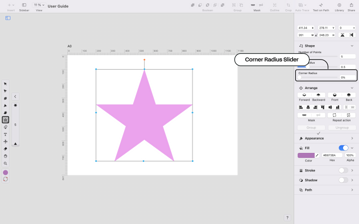
Any corner point in a vector shape can have sharp or rounded corners. In Linearity Curve, you have a slider that allows you to adjust the degree of sharpness of the Corner Radius for each point.
You can adjust the Corner Radius for a single corner point or select multiple corner points and adjust their Corner Radius simultaneously.
Click on a Bézier Node using the Node Tool, then adjust the Corner Radius Slider accordingly.
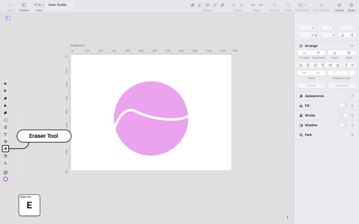
The Eraser Tool
The Eraser Tool allows deleting any area of your object. To use the Eraser Tool, you first need to select the layer on which your object resides that you want to modify with the Eraser Tool.
You can then adjust the width of your Eraser Stroke by clicking and then dragging the slider on the right side of the tool. Select the shape you want to modify. Now you can start to erase parts of the selected shape.
Note:
The Eraser Tool only works with a single vector object and doesn't work with images.
The Hand Tool
Click on the Hand icon inside the Toolbar, or press H on the keyboard, then click and drag to pan the canvas around.
You can also activate the Hand Tool by holding the Space Bar and simultaneously clicking and dragging to pan the canvas around.

The Zoom Tool
Once activated, click and drag upwards to zoom in, or drag downwards to zoom out.
You can also use the Navigational Shortcuts to speed up your workflow.

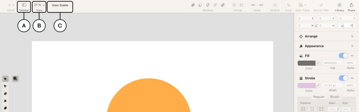
The Top Toolbar
The Top Toolbar provides quick shortcuts to important tools and actions you frequently use in the Curve Mac App.
- On the left side, you can find the Sidebar (A) button which allows you to collapse/expand the Layers & Artboards Panel.
- On the right, you can find the Zoom button (B). In the dropdown menu, you can control the zoom level, activate the Rules and Guides, and access the Grid panel.
- In the middle of the Top Toolbar, you can see the Title of your Document (C).
Customize your Toolbar
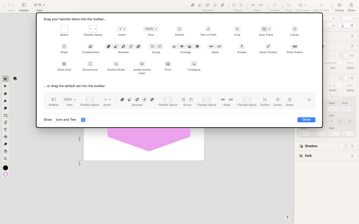
You can customize the toolbar with different buttons to suit your needs. You can right-click on the Toolbar, select Customize Toolbar or go to View > Customize Toolbar.
A screenshot overview of the Default Toolbar:
- Boolean Operations gives you direct access to the Boolean Operations of your app.
- Group / Ungroup allows you to quickly Group or Ungroup multiple objects on your canvas.
- Mask / Unmask allows you to Mask or Unmask multiple objects on your canvas quickly.
- Outline Text allows you to convert your text elements into vector shapes.
- The library will open a popover where you can easily import SF Symbols, Photos, and more into your documents.
If you want to hide the Top Toolbar, you can do it from the Menu Bar, by going to View > Show/Hide Toolbar.
:quality(75))